I have read many articles on building an Allstar node based on the commonly available CM108 sound fob and the Baofeng 888s HT radio. Most of the articles that I have read rely on making major modifications to the CM108 sound fob by removing the 3.5mm audio sockets, removing several components, scratching etchings on the board to break connections, and then tacking through hole components to the top of the board. I tried several of these methods of modifying the CM108 and frequently trashed the board. After a few attempts I thought to myself, there’s got to be a better way.
The approach I took was to make the absolute minimum amount of changes to the CM108. In this article, the only modifications I will make to the CM108 are adding 2 data lines for COS (Carrier Operated Squelch) and PTT (Push to Talk) to the CM108 chip and removing 2 resistors that provide DC power to the microphone jack.
In lieu of making major modifications to the CM108, I designed a small interface board which mounts conveniently to the bottom of the Baofeng 888s. I built the interface board using a small piece of perf board approximately 1.25″ x 1.625″. Knowing that I would at most make several of these boards, I did not pursue the manufacture of a 2 layer PCB board, but one certainly could.
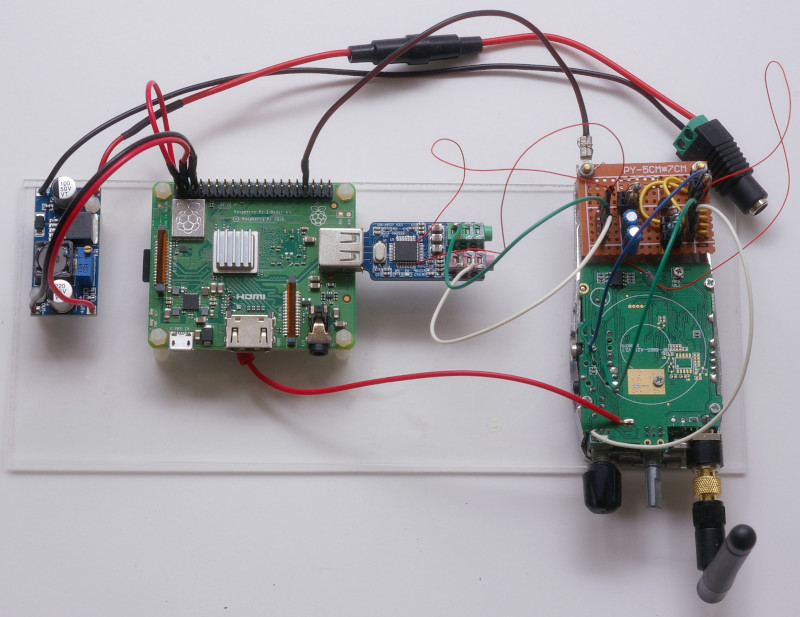
I built the prototype for this project in an open board format so I could clearly post a picture of the completed Allstar node. Everything you see in the photograph below is laid out on a sheet of plexiglass. From left to right is the LM2596 buck converter set for 5 volts, a Raspberry Pi 3A+, the modified CM108, and the Baofeng 888s modified for low power with my interface board installed on the bottom. The Raspberry Pi 3A+ is running the HAMVOIP image installed on a 16 GB SanDisk SD card. The red power line from the Raspberry Pi to the 888s has a 1N4007 in series to further drop the voltage to 4.3 volts. Power and ground go though the Raspberry Pi to avoid any noise. I would advise caution in routing power through the Raspberry Pi if the Baofeng 888s has not been modified for low power, the current could be too high for the Raspberry Pi. The node is powered through the LM2596 from a 12V 1A wall wart (not shown). For details on modifying the Baofeng 888s for low power and how to connect the line for COS, please see the article “Low Power Baofeng 888s”.
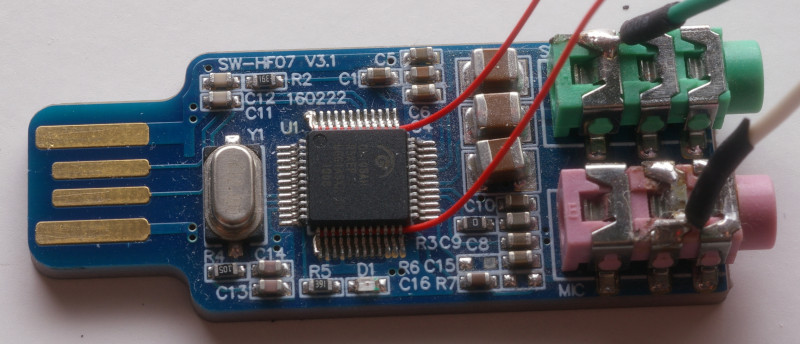
The first step is to modify the CM108. Take a ordinary pencil soldering iron and carefully remove resistors R6 and R7. These two resistors provide DC voltage to the microphone jack to power a common PC microphone. We do not want this DC component passing to the interface board. The next step is to add the 2 data lines for COS (Carrier Operated Squelch) and PTT (Push to Talk) to the 48 pin CM108 chip. From my experience, the best wire for this connection is insulated 30 gauge solid wire wrap. These are data signals and carry very little current. With wire this thin you can can push it underneath the pins on the CM108 chip for strain relief, then strip about a 1/16″ from the end, bend the tiny striped end 90 degrees, tint it, and tack to the pin on the CM108 chip. The first wire is for COS and should pass under the top pins and be tacked to pin 48. The second wire is for PTT and should pass under the bottom pins and be tacked to pin 13. Be sure to leave yourself plenty of slack so that you can reach the interface board once the unit is complete. The last step is to connect the 2 audio wires for transmit and receive to the top of the jacks. I simply tack the wires to the top of the green and pink sockets. Tack one wire to the tip of the green socket and one wire to the center of the pink socket. Below is a picture with the modifications completed.
The next step is to build the interface board. I decided to do this with a small piece of 0.1″ perf board mounted to the bottom of the Baofeng 888s radio. The 2 holes in the bottom of the radio’s aluminum heat sink provide a good physical mounting point and a good ground connection between the radio and the interface board.
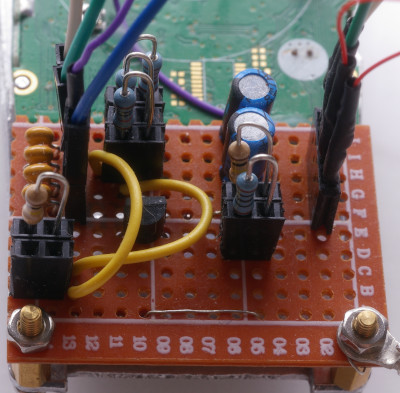
Since this is a prototype, I chose to use female headers for the 7 resistors to facilitate easily changing their values. I also chose female headers for the 4 pin connections to the CM108 and the Baofeng 888s to modularize the construction. All of these connection could be soldered in a final product. I would continue to use headers for the 2 audio input and 2 output resistors to allow adjustment of the audio levels. All bottom wiring was accomplished with 28 gauge bare solid copper wire. The only component side wiring are the 2 yellow jumper wires.
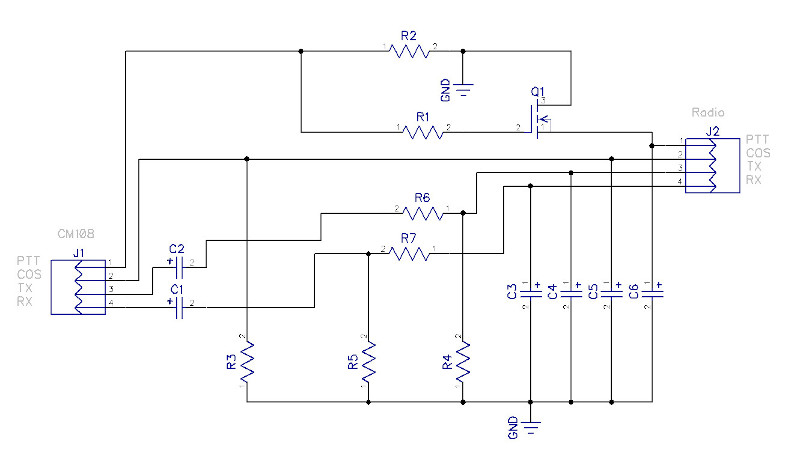
Below is a schematic of the Allstar node interface board. C1 and C2 are 10uf audio line coupling capacitors. The 4 RF filtering capacitors C3 – C6 are 1000pf. PTT is accomplished via Q1, a 2N7000 MOSFET which grounds PTT from the radio when the PTT signal is asserted by the CM108. R1 is a 100 Ω current limiter and R2 is a 100k Ω pulldown. R3 is also a 100k Ω pulldown on the COS line. R4 – R7 are used to adjust the transmit and receive audio levels. With my CM108 and Baofeng 888s, the series resistors for both TX and RX, R6 and R7 respectively, are both 10k Ω. For the RX line, I am using a 1k Ω for R5 to ground. For the TX line, I found that there was already sufficient attenuation to not include a R4 to ground.
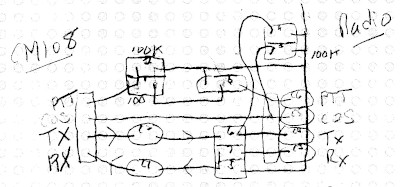
Hear is a quick hand drawing showing the manual “etching” of the perf board. All the straight lines are on the bottom of the board made with the 28 gauge bare copper wire. The 2 curved lines are the yellow insulated wires on the component side of the board.
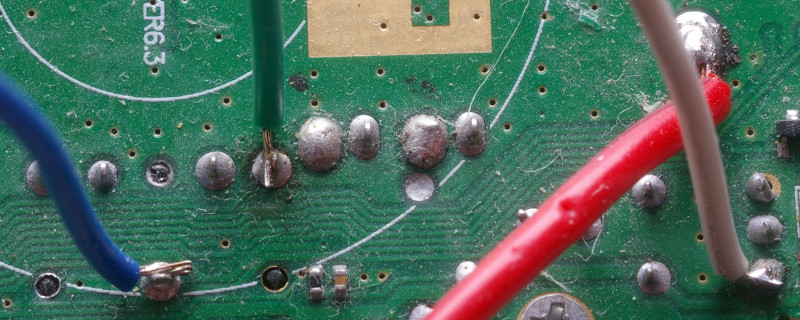
Below is a closeup of the connections to the Baofeng 888s. The red wire is power from the LM2596 buck converter with the 1N4007 in series to drop the voltage to 4.3 volts. The remaining wires are from the interface board. The blue wire is PTT. The green wire is TX. and the white wire is RX. COS is connected from the interface board to the chip on the under side of the 888s as outlined in the article “Low Power Baofeng 888s”.