
The BME280 temperature, humidity, and pressure sensor was developed by The Bosch Group. The sensor is available as a 8-Pin LGA from the manufacturer. To simplify this project, we will be working with one of the many breakout boards available that allow the sensor to be easily incorporated into a breadboard, Arduino, or Raspberry Pi project.

The BME280 is available from a variety of sources. I purchased mine from AliExpress, but you could easily source a one from Amazon, Ebay, etc. If you are planning to incorporate the sensor into an Arduino, ESP32, or Pi Pico W there are libraries available with the Arduino IDE to operate the sensor. In my case, I have a Raspberry Pi running as a DNS server and ad blocker 24/7, so I decided to incorporate the sensor on that SBC using Python.
There are two flavors of the BME280 sensor available, one for 5 volts and one for 3.3 volts. Take care to select the correct voltage for your project. For the Raspberry Pi, we will be using the 3.3 volt version. The sensor I purchased arrived with loose headers so a little soldering was necessary to add the six pin header to the breakout board.


Here we see the bottom of the BME280 showing the 6 pin header and labels for each pin. We will be using the four pins VCC, GND, SCL, and SDA on the breakout board. The first two pins are to provide 3.3 volts of power to the sensor, and second two are for the I2C interface between the sensor and the Raspberry Pi.
A close up of the connections to the Raspberry Pi. The white wire on pin 1 is 3.3 volts, the black wire on pin 9 is ground, the purple wire on pin 3 is SDA, and finally the gray wire on pin 5 is SCL. This wiring should be consistent for any “modern” Raspberry Pi with a 40 pin GPIO header.
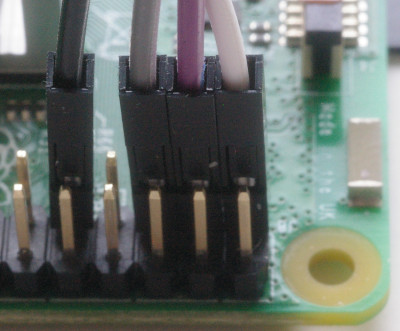

Diagram showing the connections between the Raspberry Pi and the BME280 sensor module.
Now that our wiring is complete, we need to move from hardware to software. First, we need to enable the I2C bus on the Raspberry Pi. Log on the Raspberry Pi and open a console window, or, if your Raspberery Pi is headless, use a SSH connection with a tool like PuTTY. Enter the config utility, sudo raspi-config, and in the menu choose 3, “Interface Options”. In the next menu, choose I5 to enable I2C. To check that your BME280 is detectable, we will install the i2c-tools and then run i2cdetect. This will show us the address of the sensor which you will need for the Python script. In my case, the address is 0x76.
sudo apt-get install i2c-tools
i2cdetect 1
There are many libraries available to facilitate accessing sensors on a Raspberry Pi with Python. For our example we will be using libraries from Adafruit. Our first step is to add an abstraction layer that will allow us to use any of Adafruit’s Circuit Python libraries on the Raspberry Pi. The software to accomplish this is called Blinka. To install Blinka on a your Raspberry Pi, please read Installing Blinka on Raspberry Pi and Python Virtual Environment Usage on Raspberry Pi from the Adafruit website. Once Blinka is installed, you can proceed with installing the Circuit Python library for the BME280 using the following command:
pip3 install adafruit-circuitpython-bme280
Once the library for the BME280 is installed on the Raspberry Pi, we can create a Python script on the Raspberry Pi to read the sensor and then perform a HTTP method POST to a receiving php script on the website. The “key”: “yoursecuritykey” is included in both the Python and receiving php scripts to ensure no unauthorized access to the table. The Raspberry Pi Python script, for example yourpythonscript.py, should be as follows:
import board
import requests
from adafruit_bme280 import basic as adafruit_bme280
i2c = board.I2C()  # uses board.SCL and board.SDA
bme280 = adafruit_bme280.Adafruit_BME280_I2C(i2c, 0x76) # I2C address is 0x76
tempF = bme280.temperature * 9 / 5 + 32
humidityP = bme280.humidity
pressureI = bme280.pressure * 0.02953
url = "https://www.yourdomain.com/yourscript.php"
payload = {"key": "yoursecuritykey", "temperature": '{:0.1f}'.format(tempF), "humidity": '{:0.1f}'.format(humidityP), "pressure": '{:0.1f}'.format(pressureI)}
response = requests.post(url, data=payload)
Before actually posting data to the website, we need to create a custom table in the WordPress database. You can name the table anything you prefer, however, I would preface the table name with your WordPress prefix, the default being wp_. The table’s columns begin with a unique record id set to auto increment each time you post data. The next three columns will hold the sensor data from the BME280 for temperature, humidity, and pressure. The final column will timestamp the entry, so there is no need to get the time on the Raspberry Pi and pass it to the php script. Log on phpmyadmin, open your WordPress database, and under SQL run the following to create the table:
CREATE TABLE wp_yourtablename (
    record_id INT(5) UNSIGNED AUTO_INCREMENT PRIMARY KEY,
    temperature VARCHAR(5),
    humidity VARCHAR(5),
    pressure VARCHAR(5),
    date_time TIMESTAMP DEFAULT CURRENT_TIMESTAMP ON UPDATE CURRENT_TIMESTAMP
)
Once the table is created, you can create the receiving php script on the website. Even though we are calling wp-config.php for the database credentials, I would still set the protection on this file the same as wp-config.php. I my case, both are set to 400. Here is the receiving php script:
<?php
require_once 'wp-config.php';
$key_string = "yoursecuritykey";
if ($_SERVER["REQUEST_METHOD"] == "POST") {
    $key = $_POST["key"];
    if($key == $key_string) {
        $con = new mysqli(DB_HOST, DB_USER, DB_PASSWORD, DB_NAME);
        $sql = "INSERT INTO wp_yourtablename (temperature, humidity, pressure)
        VALUES ('" . $_POST["temperature"] . "', '" . $_POST["humidity"] . "', '" . $_POST["pressure"] . "')";
        $con->query($sql);
        $con->close();}}
?>
Test both the Python and php scripts by running the your Python script on the Raspberry Pi. For each execution, you should see a new row appear in the custom table. Use phpmyadmin to view the table. To routinely capture sensor data and sent it to your website, your will need to add the Python script to your crontab. Take care to preface the Python script with the correct path for your Raspberry Pi.
python3 yourpythonscript.pyNow for the final step, we want to display the BME280 data in a WordPress page. To accomplish this we will need to create a custom template in WordPress. The template file needs to live in your active theme folder. For example, create the following yourtemplate.php file in your public_html/wp-content/themes/youractivetheme folder.
<?php
/* Template Name: yourtemplatename */
get_header();
echo 'Temperature (F)'.str_repeat(' ', 7).'Humidity (%)'.str_repeat(' ', 7).'Pressure (inHg)'.str_repeat(' ', 7).'Timestamp'.'<br/>';
global $wpdb;
$table_name = $wpdb->prefix . 'yourtablename';
$results = $wpdb->get_results(
"SELECT * FROM $table_name ORDER BY record_id DESC LIMIT 24");
foreach($results as $row)
{echo $row->temperature.str_repeat(' ', 25).$row->humidity.str_repeat(' ', 21).$row->pressure.str_repeat(' ', 25).$row->date_time.'<br/>';}
get_sidebar();
get_footer();
?>Now, create a new page in WordPress, and under Templates select your new custom template named yourtemplatename. There is no need to add any other content to the page. When you view the page, you should see the latest 24 rows of data from your BME280 sensor. Here is a link to my page showing my latest 24 rows of BME280 sensor data.