
The scope this article to modify a Baofeng 888s HT to prepare it to be used to build an AllStar node. There are many excellent resources on the internet and YouTube on building an Allstar node with the Baofeng 888s that I highly recommend watching before proceeding. One resource that I found very helpful is allstar setup.com. Additionally, be aware that there are several revisions of this radio over the years so the radio you acquire may not match exactly with other internet resources, YouTube videos, or photographs in this article.
A preliminary step that you should consider is picking an available simplex frequency to communicate with your node, a PL tone, and programming them into the radio before disassembly. You can still plug in a programming cable after the modifications are complete, but it is easier to do it first and then thoroughly test the radio.. I use Chirp to program the 888s.
The first step in disassembling the Baofeng 888s is to remove the antenna and battery. Next, pull off the volume and channel select knobs on the top of the radio. Now, looking at the back of the radio, remove the two Philips head screws that secure the belt clip. Keep these two screws safe as as they are what you will use to mount the radio later to a board or chassis. Remove the two Torx screws at at the bottom of the battery compartment. I have found that a T9 fits the best, however a T8, although a little sloppy, will work in a pinch.
On the top of the radio there are three spanner rings, one for the antenna connector and two under the volume and channel select knobs. The rings can be spun off with a spanner wrench if you have one handy or they can be removed simply with a sharp object like a screwdriver or even a very thin pair of needle-nose pliers.
Once everything has been removed you need to pry the aluminum heat sink with the attached PCB out of the plastic case. Start at the bottom where you removed the two Torx screws and lift and pull forward away from the antenna and knobs. Once you separate the PCB and heat sink from the plastic case, there will still be two wires connecting the PCB to the speaker in the plastic case.
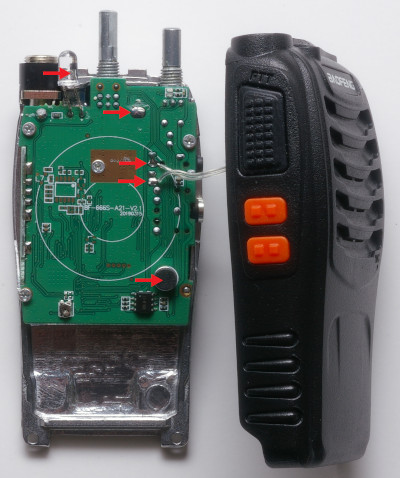
Looking at the photograph, I will be describing actions indicated by the red arrows from top to bottom. Remove the LED. You can either clip it off or you can desolder it. The next, and most critical step, is to desolder the main power connection to the PCB. Carefully desolder this connection with a solder sucker or copper wick. You will be soldering this connection later in the project and will also be adding a wire to power to the radio. Moving down, desolder the speaker wires from the circuit board. Finally, the last red arrow points to the radio’s microphone. This can be clipped off with a pair of flush cutters. You can perform the steps above in any order.
Next, remove the PCB from the aluminum heat sink. This is accomplished by removing the 4 screws and gently lifting the PCB from the heat sink. Be careful when you do this to not damage the antenna connector which will now be floating with only the center wire connected.
With the PCB removed from the aluminum heat sink its time to remove the final transistor to reduce the power output of the radio from 2 watts to around 100 milliwatts. This will be plenty of power for a node radio and will reduce heat and power consumption dramatically.
Remember, even if you are just listening to a conversion with another radio, the node radio is transmitting most of the time.
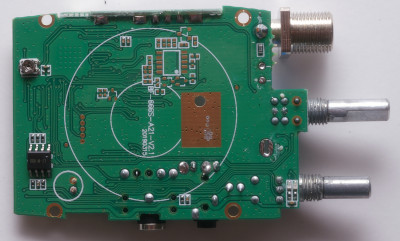
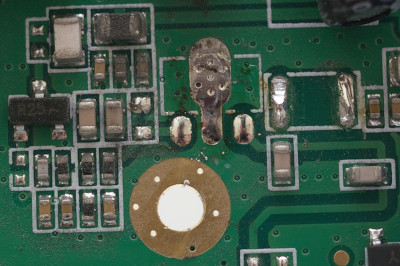
Here is the back side of the PCB that was attached to the heat sink where you will remove the final transistor and attach a wire for COS.
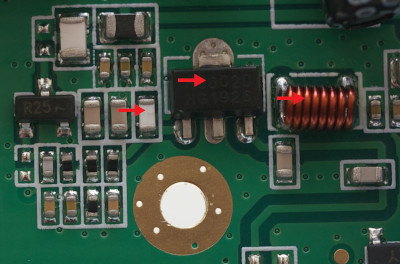
This is a close up of the back of the PCB showing the 3 components, identified with red arrows, that need to be removed from the PCB to operate at low power. There’s a small capacitor, the output power transistor, and an inductor.
The most difficult of the three is the power transistor since it is solder directly to the PCB. I have tried a variety of techniques to remove the transistor. From my experience, the easiest is to destroy the transistor with a pair of cutters making it much thinner and then remove the remainder with a soldering iron. I tried a dremel with a cut off wheel, but always damaged the PCB. I would absolutely not recommend a hot air gun as you will likely loosen additional components.
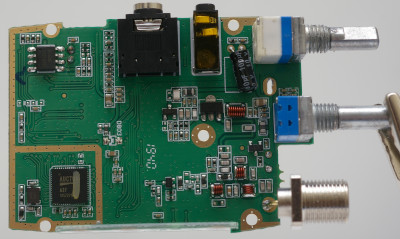
This picture shows what you should be seeing after successfully removing the three components.
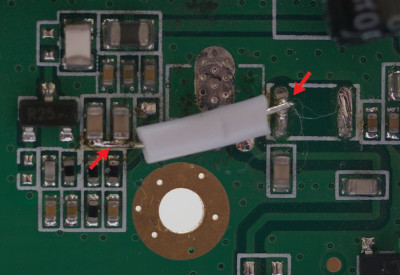
The next step is to bypass the final transistor. I accomplished this with a very thin piece of wire covered with a piece of insulator. You will need to bridge the bottom of the two capacitors and connect them to the first pad where you removed the inductor.
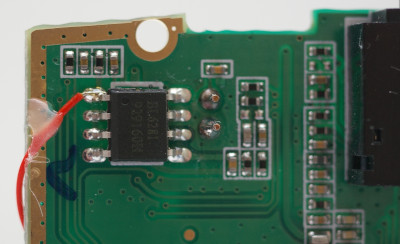
Locate the 8 pin chip on the back of the PCB and solder a wire to the pin closest to the corner of the board. This connection is so you can detect when the radio is receiving a signal. This logic signal is generally referred to as Carrier Operated Squelch or COS. Leave a generous lead to easily reach your interface board or sound fob. A dab of hot glue is a good measure for strain relief.
It is now time to reattach the PCB to the aluminum heat sink. Take care to align the thin power connection tab from the heat sink through the slot in the PCB. Also take care with the positioning of the antenna connector during this process. Once you are confident that the PCB is sitting properly on the heat sink, reattach it with the 4 screws. At this time do not solder the power connection, you will be adding a wire to this position when building the node. Also, there is no need to reassemble the PCB and heat sink to the plastic case. As a last step, I generally push on the power knob to facilitate turning the radio on and off during assembly of the Allstar node. I generally leave the channel selector knob off so it does not accidentally get changed.